Soundboard Construction

Soundboard Construction
Adirondack Spruce - the redheaded stepchild of the Luthier world

Wednesday, November 21, 2012

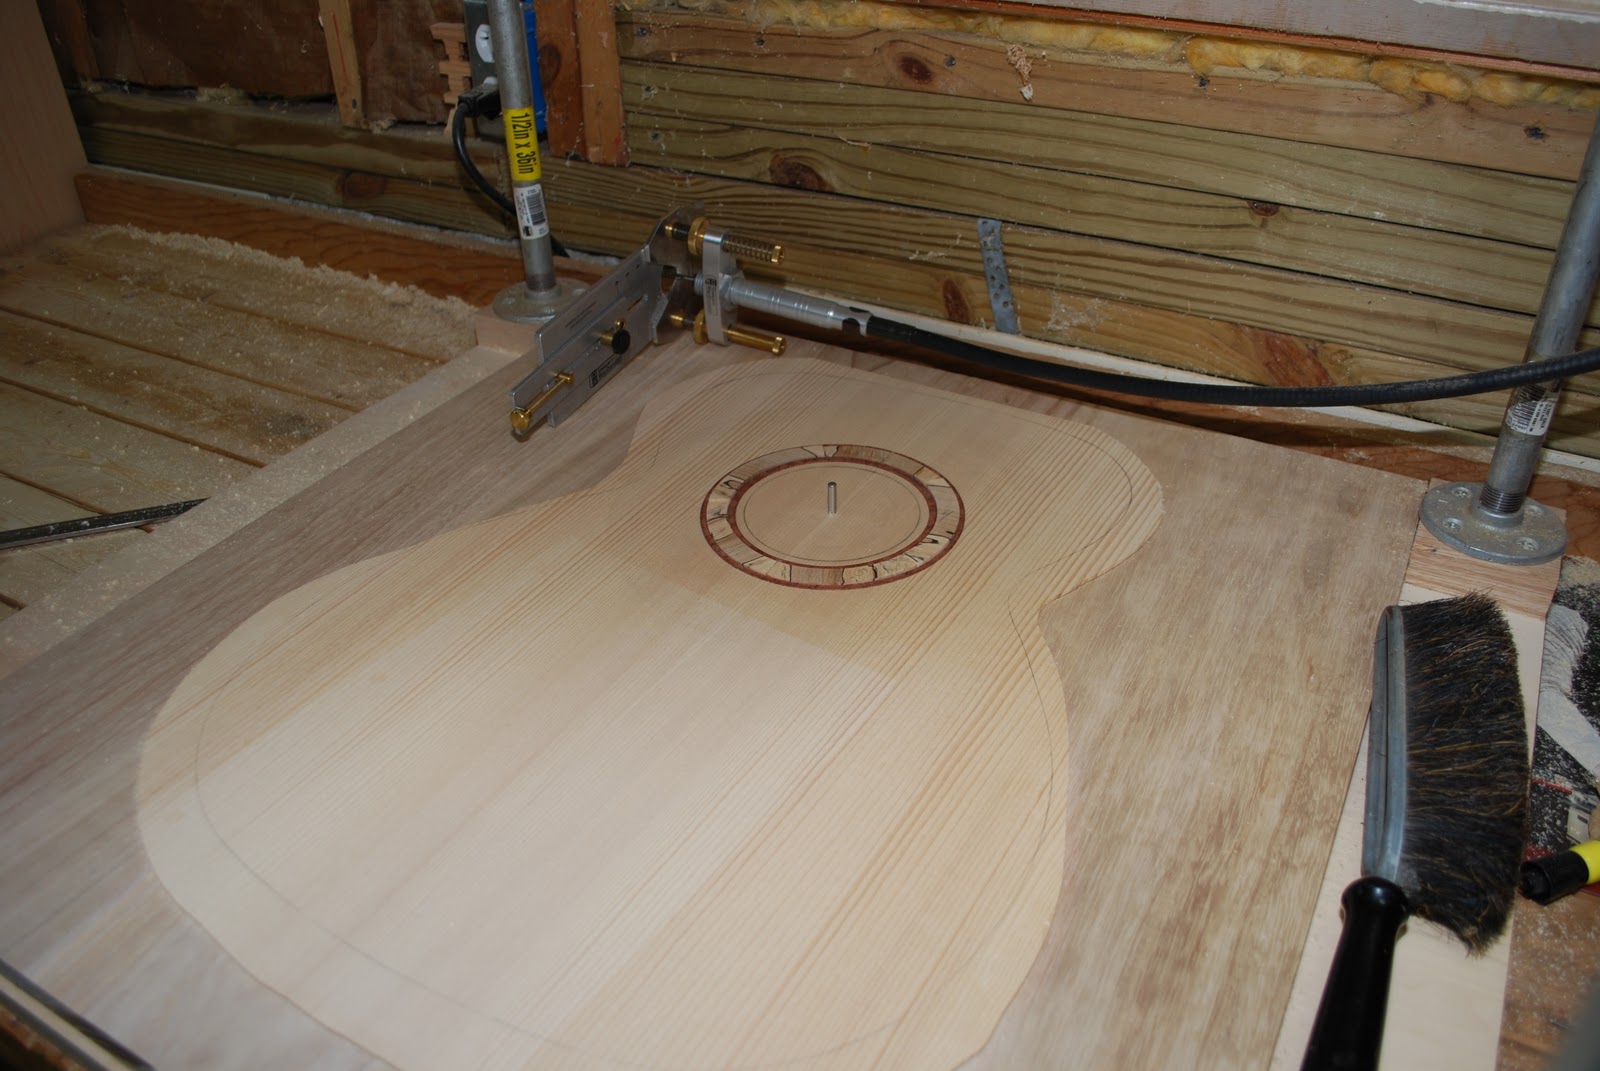
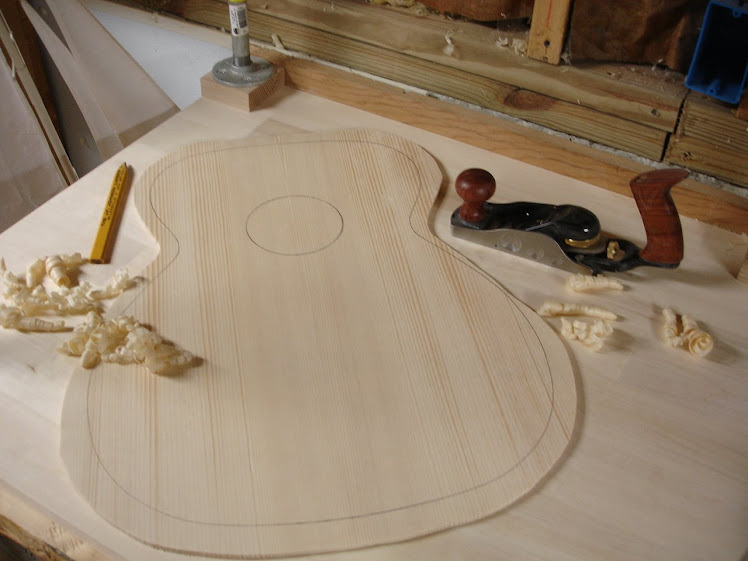
So recently I let my ADD get the better of me, and much to my surprise and pleasure, the results were incredible.  Finally able to spend a few unadulterated hours with my arboreal love, I found myself scratching my head trying to figure out where to pick back up and what most needed work.  As I soon discovered, I had no desire to spend my few precious hours sanding away on the soundbox trying to get the sides prepped for gluing the back purfling.  Instead I decided to work on a key, yet hidden, aesthetic of the guitar - the soundbox label.

The soundbox label is generally very simplistic and utilitarian.  Its most basic function is to denote the manufacturer, model, serial number, and country of origin.  Some higher end manufacturers and home-spun luthiers, however, use the soundbox label as another means to distinguish themselves and their creations.  For me, it's the icing on the cake - A chance to make an otherwise ubiquitous musical instrument truly one of a kind.  As such, I did not want to rush headlong into such a meaningful and delicate operation.  Time to call in the big guns - and I do mean BIG!

Meet Sarah - artist, professional student, missionary, wood sprite, adventurer, boater extraordinaire, amazonian giantess...  And fortunately (or unfortunately [jk]) for me - sister-in-law.  Yes folks, that is a fully mature 400-lb bighorn sheep, dwarfed as it were by Sarah's 8'2" height;-).  Ok so maybe I exaggerate a smidgen, but only just!


Anyway, getting back to the point - Sarah, here, is an incredible visual artist and it was her input that birthed the inspiration for my first guitar's soundbox label.  So if you don't like it, you can blame her!  One day I was painfully trying to pull together the various tailored aspects of the guitar in addition to my father's personality and preferences in an effort to design a suitable label.  To be honest, I was spinning in circles getting nowhere.  Gigantor, uh I mean Sarah was looking over my shoulder shaking her head when I finally threw my hands up and asked her for help.  She immediately jumped at the opportunity to keep me from a fate worse than death - aesthetic ignominy!

To me it was an equation, something to solve.  Mix together all the inputs and adjust the variables until you reach the correct solution.  To Sarah,     hmmm, to Sarah.....  well, to Sarah it was anything but an equation. I cannot begin to understand how the mind of a woman works, let alone that of a female artist - so suffice it to say she did her magic and so a masterpiece was born.

Question:  Of what principle material is a guitar made?

Answer:  Wood, and in my case, bloody, gory wood...  (sharp implements and an impatient, distractible nature do not mix well!)

Question:  What primarily produces each guitar's unique tonal quality?

Answer:  The unique combination and grades of the woods used in its construction.

Question:  What is most central to a guitar's identity and overall quality?

Answer:  The wood!

So it all boils down to the wood, and what is wood?  Dead and seasoned trees.  And what defines my dad the most, apart from his servants heart and identity in Christ?  His passion for the wild spaces of our earth, the deep forest sanctuaries, the quiet alpine glades, the timeless Appalachian expanses.  So what better to bind the musician and the instrument together than an element fundamental to them both.  Just as a seed falls to the ground with the hope of springing forth into life, finding fertile soil and plentiful sun and water, it will venture into being and only the Lord know the plans He has for the seedling - so too my dad's guitar.

Without further ado, I give you my falling seed - Verdani Guitars Model 14-000+, No. 001.


And yes, she was a willing victim...


Wednesday, October 24, 2012

Closing the Soundbox

I've started the long and laborious process to close the soundbox (ie. attach the back).  Actually compared to the bracing or the rosette, it's not that bad.  Before you can close the soundbox though, there a few very important steps you can't forget - namely bracing the back.  I'm missing some good pictures, so I will update this post later.

You saw me route and glue the back strip in a previous post, now it's time to work on the inside surface of the back.  First you start with the center seam reinforcement brace.  This brace is thin but wide and you want to make sure that the grain runs vertically in the cross-section.  Once you've cut the brace (remember to watch your fingers! I had a few close calls and it pays to invest in a Saw Stop table saw...) it's time to glue it and clamp it like any other brace.  The back should be braced in a radius dish so a go-bar clamping system works best for this step.

Once the seam brace is secured, you'll want to round out the profile.  I found a micro chisel (I use Flexcut hand chisels) and sanding blocks do the job most effeciently.  Once it's rounded and smoothed you can mark the places for the back cross braces (typically three) and use a modeler's saw and more micro chisels to remove sections of the seam brace for the cross braces.  Similar to how the soundboard braces were prepared, cut and and then shape the cross braces using sandpaper attached to your radius dish.  Then you can glue and clamp them into place.  Now it's time to finish shaping the profile of the cross braces to prepare it for attaching to the soundbox.  One final step for the back is to trim off the excess seam brace from the top and bottom so that it will fit snuggly between the head and tail blocks already on the soundbox.  You can see me doing this below.


Thursday, May 31, 2012

It's alive, it's ALIVE!!! Well not quite...

Pop quiz hot shot - what do you do with a finished soundboard and shaped sides?  No it's not a bomb on the bus...  You join them!  And what happens when you join them?  It's almost like you're creating Frankenstein's creature.  I've tasted just a hint of the ecstasy Gene Wilder so convincingly portrayed as he succeeded in raising to life that which was inanimate.  And trust me, it's altogether dizzying and excruciatingly exhilarating.  So without further ado, I present to you two-thirds of a sound box!


So the question remains - how'd you do that???  Answer: it was a miracle like manna from heaven;)  Ok, fine, I guess I'll tell you.  It all begins with kerfing.  I started out with reverse rounded kerfing - bad idea...  I ordered the reverse rounded kerfing at the beginning of the project along with the soundboard, back, sides, neck, fretboard, and saddle stock.  At that early stage I had no idea what I was doing nor what would work best.  As it turns out, the reverse kerfing is not the best type to use on smaller bodied guitars.

Kerfing as it turns out is used to provide a better (larger) gluing surface for the back and soundboard.  It basically makes a wide ledge allowing more contact surface area for gluing at this critical structural joint.  The acoustic guitar is in essence an incredible engineering problem because it epitomizes all the classic trade-offs of weight to strength, form to function, and on and on and on.  Traditional kerfing simply means that the cuts in the strip face outward when fastened in the guitar (meaning the slits are exposed to the soundbox).  Reverse kerfing, on the other hand, is designed so that the cuts in the strip face the side they are being glued to (meaning the slits are against the side and are not exposed to the soundbox.

My suspicion is that reverse kerfing may provide minutely better sound quality or projection because the sound waves generated by the guitar are not broken up by the small kerfing slits since the smooth backing is what's exposed. But, as I soon found out, reverse kerfing requires larger turn radii - when you try to use it on smaller guitars it snaps far too easily.  So bottom line is, I had to reorder traditional kerfing which worked a lot better.

Gluing the kerfing initially was a little disconcerting but as I became familiar with it, I found that there's really not much to it.  I started with one side, trimmed a length of kerfing to the proper length, put a long bead of glue along the surface to be glued to the side, smeared it so that the amount of glue was uniform, and then started from the heal block and worked along the sloping curves toward the head block.  You need to make sure you have a lot of stiff spring clamps on hand so you can clamp the kerfing along the side as you work your way along it.  Don't worry about squeeze out, you just want to make sure the kerfing is a little proud of the edge and that there are no gaps with the side along it's length.  If you don't have enough clamps or if it happens to break, it's ok to do it in sections.  I found it easiest to actually break each side in two sections, one from the heal to the apex of the waist and a shorter one from the apex to the head block.  If you want to remove the excess squeeze out once the kerfing is in place, now's the time to do it, otherwise just trim it with a chisel, plane, or sanding block after it's dry.


The next step is to re-plumb the top edge.  I started with a small hand plane and a palm plane, they worked well to get a good clean surface and to knock everything down to the same level.  To finish it off, I used a sanding block to make sure everything was level and consistent.  The final step before gluing the top is chiseling out the notches for the soundboard braces.  To do this I place the soundboard on top, marked the sides, then started carving conservatively with Flexcut micro chisels.  It's a little tedious, but the iterative process of carving some, rechecking with the top, carving some more, etc. makes for a good fit and the least amount of over cutting.  A word of caution, it does take some finesse and a lot of patience.


Once everything fits snuggly and you're good to go, the last step is to apply the glue to the top of the kerfing and sides, smear it good, place your soundboard, then apply uniform pressure along the perimeter with your go-bars.  Once it's dry, you can trim the top flush to the sides with a laminate router and flush bit and voila!  It's ALIVE!  almost...

Sunday, November 20, 2011

Finished braces

You know what I just realized?  I went through that whole long write-up on bracing the soundboard but I never put up finished photos!  Well here some are.  The one just below shows gluing the main upper bought brace.


This one shows what they looked like just before shaping.


It looks like I ran out of current pictures on the computer I'm on...  Blast you network cloud, why are you so confusing and far away?!  Oh wait, I found a few more, this one shows the secondary upper bought brace shaped.


Let's find some more...  Shaping a fan brace.


And notching the first x-brace to fit with the second...


And voila, magically all done!! Really, it's that easy (sike!).


Saturday, October 29, 2011

My thumb hurts!

Wow, I'm glad to see the site's had so many hits!  We're up to over a thousand!  Sorry I've been slow to post, it's largely due to the fact that I pretty much caught up with where I am on the guitar and I haven't had much time to work on it recently.  Though, I did get the back braces curved, glued, shaped, and I'm almost finished sanding!  I will have to post some pictures soon.

Anyway, thanks for bearing with me and I'd appreciate a collective "aaawwww" for skinning the knuckle of my thumb trying to get a generator started.  Ok, ready, 1, 2, 3...  AAAAWWWWW.

WOW, thanks, I already feel better.  Catch you soon, peace out home slices.

Saturday, July 23, 2011

Finishing up the soundboard braces

I apologize for the recent distractions that took us temporarily away from the soundboard.  This will finish up the soundboard braces so we can progress into bending the sides.  So... soundboard braces...

Monday, July 4, 2011

A hair's breadth from you know where...

When finishing things like rosettes and back strips and inlays, you soon find that removing material delicately sucks big time!  I am not one to enjoy hours and hours of work with little results, so I figured I'd find a better way to finish the back strip than waste my time sanding endlessly with a 200 grit hand block (by the way, you don't want a power sander of any shape or size anywhere near your guitar, trust me!).  A small trim router with a good down cut bit, on the other hand, is a totally different story...

I got the idea from some obscure place; it might have been an online forum, it might have been Scott Cayce from the Cayce Company in Hunt Valley where I get my soundboard, back, and side pieces thinned.  Anyway, it's irrelevant - what I wanted to do was alter the base of a small Bosch trim router to make a router sled.  Basically I removed the original plastic base, found some good square red oak stock.  Sized the table saw fence to 1/2" from the blade, and ripped two identical blocks.  I made sure they were the same height with calipers, and chamferred the down-facing edges with a sanding block.  I then marked the bolt holes using the original base as the template.  I drilled the smaller through-hole on the drill press first, then followed it up with the larger recess hole for the bolt heads.  Lastly, I marked the inner curvature of the base where the bit comes through on both blocks and trimmed out the overlap with the band saw.  I forgot to take a picture of the finished product, but you can see it action below.


Once I got the router set up, I could take down most of the excess maple without laboring over a sanding block and without risking damage to the back.  Before you start cutting though, make sure you test out your depth.  You don't want to ruin all your work with a deep gouge in your back.  Go nice and slow with even pressure and gentle back and forth or side to side movements to remove the material evenly.  You'll want to blow the saw dust out of the way as you go so you don't end up with inconsistent cut depths.  Once you've gone over the full length once.  Check your work closely to see if there was anything that you missed.  I set my cutting depth so that I could easily finish off the strip with some minor sanding and scrapping.  As the title alludes, you want to be within a hair's breadth of h-e-double hockey sticks, so that you remove as much excess material as possible before you switch to hand work, but not too close that you commit the mortal sin of profaning your back.

After some finishing work with the cabinet scrapper, your back should look like this and will be reading for filling and back bracing!

Sunday, July 3, 2011

Git r glued!

Now that the back strip channel is routed, now it's time for fine tuning (ie. fit check).  Take your back strip and try to slide it into the channel from one end.  See how far it slides in.  Remember to be gentle.  If it doesn't go very far, back it out and try sliding it in from the other end.

You'll most likely find, if you cut it right, that it's just slightly too small.  Rather than try to take another pass with the router, which will end up making your channel way too wide or unparallel, work on lightly sanding the back strip.  The most efficient way to get everything right is to focus on the tight spots.  Instead of sliding the back strip in this time, try to ease it in like you're laying screen piping.  You'll find that there are spots, typically either end, which the back strip fits into perfectly.  Mark the spots that don't fit in or are a little too snug on the back strip.  Carefully remove the back strip and lightly sand in the marked spots.  After a few go-rounds and it's almost there but not quite you can also take a small wedge file and lightly sand the trouble spot on the channel itself.  If you have a steady hand you should be ok, but I wouldn't recommend being too aggressive because it's all too easy to boogger up the clean channel edge and make a cosmetic faux pas.

Before you glue, be sure you can readily insert the back strip in its channel without undue coaxing.  It should be snug but not overly so.  It can also be a little loose, but you might have to go back after the glue is dry and the back strip is sanded to fill small gaps with CA glue mixed with fine sawdust.

So on to gluing... before you glue anything, make sure you have a sturdy thin brace to help evenly distribute the pressure from the fiberglass rods.  You'll also want to make sure your clamping deck is set to the right height for the back and back strip and brace and you have all your rods at the ready.  Take your instrument glue (I prefer LMI's white guitar glue) and run a thin bead down the length of the channel.  With a clean finger, smooth the bead in the channel to spread it out.  You don't want the channel to be filled with glue but you do want to make sure you get glue on the channel walls too.  Once everything's nice and whetted, insert your back strip, preferably with the screen piping method rather than the sliding method (sliding will push all the glue out of the channel).  Once the channel is in, it will be very snug; make sure it's in properly and then you can put on the brace and place the clamping rods.


Let the glue cure for a good 20-30 mins, then removed the rods and brace to allow the glue to finish drying.  You'll want to wait a few hours before you consider working on the back strip further.  In the mean time, relax, destress and have some fun like me...

Tuesday, June 28, 2011

Back Strip Boggie

Bear with me I'm going to side track for just a second away from soundboard bracing to tell you about my latest breakthrough - a successful back strip step.  Don't worry I'll get back to soundboards, but first let me walk you through the back strip since it's fresh.  You can see all the pictures at www.flickr.com/photos/vote_for_hoy/, and  clicking the little slide show at the bottom of the page should take you there too.

I started with my jointed, joined, and thinned walnut back.  I traced a center line down the seam then followed it with a line on either side of the center spaced to the width of the back strip I had set aside.  You can buy pre-made and pre-dimensioned back strips but I wanted to personalize my dad's guitar with spalted maple, tying it in with the custom rosette I had made for the soundboard.  It took me a couple of tries to get the back strip right (spalted maple typically isn't a high quality wood - the fungus tends to break down the structural integrity of the maple).  I ended up with a back strip about 3/8" wide and about 1/16" to 3/32" thick with less spalting than desired to keep it strong but enough to get the effect.  Side note - it's really tough figuring out how to plane or sand a piece of wood that thin and frail!


Above you can just barely see my three lines.  To set up my poor man's router jig (a clamped square), I carefully measured the distance from the cutting edge of the router bit to the edge of the router base and clamped the square to the workbench accordingly.  Before you make your first cut, remember to adjust your cutting depth to no more than half the thickness of the back itself; and for Pete's sake, test it on scrap wood before you go tearing up your intended piece.


Once I made my first pass along the left edge of the back strip channel, I measured the remaining width I had to cut in the channel and moved my square that distance to the right to finish off the right side of the channel.  Make sure you take your time measuring and positioning your jig, there is a lot of room for errors which could force you to find alternative back strips or even ruin your back altogether.  You can see the first pass and a close up of the finished channel below.


Alright peeps, it's getting late and I need my beauty sleep so I'll finish this up tomorrow or the next day.

Peace!

Monday, June 27, 2011

"Targeted" Advertising

You gotta love targeted advertising...  My most recent post on bracing caused Google or Amazon to put up a targeted ad for colorful neck braces!  I certainly think those in the unfortunate situation of needing such a device would be happy to find such a wide ranging selection, but I think their automated code monkeys may have misjudged the content of the posting.  Thought it was amusing.  Anyway, stay tuned for a short post on back strips - I just finished ours over the weekend!

Wednesday, June 22, 2011

Gluing and Shaping Braces

Trying to catch up while I wait for my engine compartment to be degreased and cleaned up - so I'll try not to let this awful Apple keyboard frustrate me to the point of quitting.

So last time I left you off was a set of red spruce braces prepped and ready for gluing.  Before you can glue the braces on the soundboard your need to know where to glue to darn things first, right?  You'll need a template to mark the back of the soundboard for brace placement.  I bought a nice acrylic template with strategic holes that allowed me to mark my end points for each brace on the soundboard.  You can also using tracing paper to do the same thing.  Just trace the brace outlines from your plan on the sheet (be sure to include soundboard and sound hole center reference marks), do some fancy cutting with scissors or a razor, and you're ready to begin.

Now before you start making pencil marks willy nilly on the soundboard, you want to make sure your template is centered properly.  You'll need two reference points: the center of the sound hole and the center joint of the soundboard.  If you're using tracing paper, this is where your reference marks come in handy.  Acrylic templates are likely easier to deal with because everything's already pre-marked and ready to go.  Making your brace position marks is not necessarily rocket science, but I assume it helps when you're as exact as possible seeing as the soundboard is the most critical component to the overall sound producing capability of a guitar.  And after your first try, if you find you're not completely satisfied with your marks, don't fret, erase as best as you can and try again.


Once you have the marks just right, then the fun and the terror begins - buahahhaaaahhh!

Oh, I thought you might like to know I updated the "Back to work" post with additional rosette pictures.  I also added more recent pictures on my flickr site -- www.flickr.com/photos/vote_for_hoy/.  You might want to check the post and the site out!

Tuesday, June 21, 2011

Official Verdani Email

Also readers, if you want to get a hold of me or my not-yet-realized company you can now reach me at my official email -- verdaniguitars@gmail.com

New Material -- Happy Father's Day me!!

I just happened to stumble across and incredible back and sides set of spalted myrtle.  It was just too gorgeous and rare to pass up.  I ostensibly needed some new head plates since I mistakenly destroyed the original rosewood piece to make a bridge backing for the soundboard - Oops...  Well providence shone through, and now I have a couple new rosewood head plates thrown in with the myrtle set, compliments of Steve from Colonial Tonewoods!


Also, later this summer I'll be starting the transformation of my car port into the worlds greatest home lutherie shop.  I'll be sure to include updates and pics of that too!

Catch everyone later.

Thursday, April 28, 2011

I'm still here!

Sorry everybody, I'm still here.  Just been out of town a lot recently.  Should be able to pick back up with the guitar in May, I hope I hope I hope!

Thursday, February 24, 2011

Ode to Poppop

My grandfather died suddenly last night.  I received the sinister call this morning from my sister.  It's extremely difficult to escape the sadness, the darkness of the unknown and the loss even when they've had a long and fulfilling life.  Poppop was a sailor, he was a gentle hero, kindred to a generation of heroes.  He served as a flight engineer on naval reconnaissance aircraft - the noble Coronado - just after the Peal Harbor attack in the wide expanse of the Pacific.  He survived enemy fire, scuttling, and the hells of war to return to a quiet life on the home front in southern New Jersey.  He courted and married my Nana, and settled down to start a happy family and a long career as a night supervisor in the oil refineries so prevalent on the eastern shore of the Delaware River.  My grandparents bore three beautiful girls, the likes of which inspired Disney fairy tales, and were pleased to enjoy the company of not a few faithful pets.  

My own earliest recollections of my grandparents were those of my Nana and Poppop babysitting we three grandchildren whilst my parents - the strong Dad and the gentle Mom (the oldest daughter of my grandparents) - went off to Germany to take advantage of a well deserved vacation getaway.  My Nana didn't want me to waste milk with my cereal; I don't know how any self respecting 4 year old can eat his morning cereal without a full bowl of milk, but Nana was the boss.  She made up for it, though, for many long years hence by cooking the best scrapple you can imagine every time we visited.

Poppop, on the other hand, always had the sweets to balance out my savory Nana.  He kept a heaping bowl of black licorice at the ready whenever we were due for a visit.  It still is my favorite.  I can still smell the sweet pipe musk lingering in the air of that Westville palace.  My Poppop's knee was always ready and inviting and comfortably fit two writhing boys.  When he wasn't painting mysterious lands and exciting tales across the canvas of our imagination, he would patiently read our favorite spooky fable over and over again.  Strong Dad comes close to being as good an orator as my old salt Poppop, but still just close (wink).

When we weren't exploring the hidden treasures of their ancient dungeon or steepled towers, yes it's hard to believe the Westville suburbs go back to the Middle Ages - but tis true!, we romped through beach grass, scrutinized writhing minnows, soared on yellow swinging bench wings, dodged ferocious beach beasts made of horseshoes, crabbed and fished like ancient mariners, and sped over the water at the speed of sound - yes we were the hottest thing on two pontoons and Poppop had the Top Gun hat to prove it - all within a little idyllic patch of Indian River Bay real estate no bigger than 50 feet by 200 feet.  It was our own little utopia where the busy world stood still, all time ceased, and the wisdom of the Shakers pervaded our existence - it was our very own hundred acre wood.

As happy and endless as those brilliant moments shone, alas the cruel earth refused to halt her inexorable spin and as most memories fade so did our ability to remain in that world.  The story is always the same, the boy who loved a tree but eventually grew up and needed wood for a house, the friends who create a magical world across a bridge which ends all too abruptly, the stories are omnipresent because that is the reality of the cycle of life.  We have life because we also have death, they are two sides of the same coin.  It is a cycle which will only be broken by the One who created it in the first place.

Which brings me to my ultimate point -- which is, my Poppop, while no longer remaining with us in the flesh, does live on.  Yes, his life will remain in the fond memories of those who continue on, but those too will eventually fade.  As human beings we all suffer the same fate, to be returned to dust and ashes, to slowly fade into obscurity as the decades, and generations, and eons march on.  But while our physical bodies pass quickly and our remembrances some time later, our spirits live on - my Poppop is more real now than he ever was in life, and it's because he's kneeling in the presence of our Lord.  My Poppop lives because Christ lives, and He has prepared a place for him.  My Poppop has gone on before us, and as the gentle hero he is, he's already started preparing a place for me too - an incorruptible paradise far greater than any sandy patch of rented ground could ever offer.

My Poppop was and forever will remain a good and faithful servant who is now with his Beloved - and we all have big shoes to fill with his passing until we too can join him with shouts of joy and praises to our Savior.


Thanks for letting me process and wax nostalgic. 

Monday, January 31, 2011

Brace yourselves...

Haha, get the catchy title analogy??  You know, because we're talking about soundboard bracing next?!?  Yaarrrr... I know my jokes are bad so I'll just stick with the guitar building.  Having finished the rosette, my next step was to brace the top, coming one step closer to the point where I could finally assemble the body.  The first step to bracing is, as with anything, preparation, and the largest part of preparation for bracing is, of course, making your braces.

Braces are typically made out of a soft wood and may or may not be matched with your soundboard material.  It so happens that, more often than not, top braces are made out of Adirondack Spruce.  While it's hard to find Adirondack billets large enough and clean enough to use for larger guitar tops, it's extremely easy to find suitable Adirondack stock ideal for braces.  The stock doesn't need to be extremely even grained or especially large; it's fairly common to find pieces of adequate size to then reduce for your large and small braces.

All my braces came from one solid block; it's pretty simple to do, you just need to measure many times so you only have to cut once for each individual brace.  I started with the easiest cuts and the largest on the soundboard, the x-braces.  One important rule you need to remember, however, when cutting your braces is be sure to cut each brace with the grain in the proper orientation.  I forget now exactly which direction is correct (I think you want the grain to run vertically but double check first).  I made sure I cut the width of each brace as close to exact as possible, but I allowed a little extra height on them because I'd be carving them down to the proper size later.  I also made sure I left plenty of length so that the tips would extend beyond the edge of the soundboard.

Once the x-braces were ripped with the table saw (watch your fingers), I proceeded to rip the rest of the braces to include the tall upper face brace, the sound hole braces, and all the remaining fan braces.  Once they were are sized properly, I separated and labeled each brace.  You can group braces into two broad categories - flat and curved.  The flat braces are the easiest to glue, so all the books say to begin with them.  I'm not one to trump age old wisdom so I reiterate, start with the flat braces first!

As far as creating curved braces goes, it's an art and not a science.  There are a million ways to do it, but here's how I ended up doing it -- I marked the general outline of  the desired curve on the side of the brace by drawing a curve from the center to a mark on each tip.  Your plan will tell you what kind of curve you need - it's typically a difference of anywhere from 1/16th to an 1/8th from the center to the ends (I'm not sure how that relates to curve radii...).  Once I had my lines I simply sanded the gluing faces to those curved lines as best as I could using a 6-inch belt sander (thanks Mom, Dad, Brother, and Sister for the awesome Christmas present!).  I then hand sanded the curved braces to finish them off with a 150 grit block sander.

As I alluded to in the previous paragraph, the final step to preparation is to sand the gluing faces with 150 grit sand paper; this makes sure you have a good bonding surface.  Well that's it for prep.  Next time I'll go through the gluing and shaping process for flat and curved braces, and yes! I will make sure I include pictures.  I apologize for the scarcity of photos; I know personally I'd have trouble maintaining interest were there few to no pictures included...  Shame on me for being lazy.

Fuer meine deutsche Freunde dort drueben

Jo jo jo!  Was ist los meine Kumpel??  Es ist scheiss kalt hier aber ich gehe nach San Diego naechste Woche.  Es freut mich dass ihr schaut meinen Blog noch ab und zu an.  Viel Spass und hoffentlich bin ich nicht schrecklich langweilig.  Bis spaeter.

Sunday, January 30, 2011

Don't use a power drill when tired!

A word to the wise...  don't use the cordless drill to drive 2 inch screws in unpiloted sturdy plywood.  Take it from me, the drill will slip and you'll end up puncturing the finger you were using to steady the wood.  And no, unlike bullet wounds, the entry hole is much worse than the exit hole.  If I ever make it beyond the shock, I'll upload a picture of the aftermath...

here's the picture from my cell phone

Saturday, January 22, 2011

Back to work

If I have it correctly, I last left off at selecting the inlay materials and cutting them out.  I'm not sure if I mentioned how difficult it can be to create sectioned inlay pieces or not.  Well it is and it is primarily due to the pesky little seams.  Now you can add a whole new dimension of complexity if your rosette jig is a little out of true, as mine is, which means some sections are wider than others.  Now assuming all your rosette sections are the same width, you'd think that joining them to make a perfect circle would be easy right??  Think again!  I'm a mechanical engineer with a masters degree (albeit a poor one) and I still got it wrong!  It just goes to show a little experience, a little feel, and a little luck make a trifecta.

I found that once I got the approximate section lengths close, I could use a good sanding block to slowly true all the sections up.  It was slow and tedious and I'm certain there are a thousand better ways to do it, but at the time it was all I could go by.  I'll let you in on a little secret I did learn though...  you can make all the pain go away, well most of it anyway, by simply resigning yourself to leaving a gap at the top of your rosette with the intention of covering it over later with the fingerboard.  Being a purist (or more aptly put - anal) I refused, but had my work taken just a few more hours, I would have succumbed to the easy method too.  

Once I got the entire rosette (the inner and outer rings of bubinga and the middle ring of spalted maple) ready for placement I then began experimenting with the same jig to get the cut depth and inner and outer dimensions correct.  I made my practice rosette slot in a wide board of high grade pine to simulate the spruce.  I made successively wider and narrower passes until I got the channel width just right and I made sure I marked those "precise" spots on the circle jig.  After practicing placing the pieces a few times and triple checking the cutting depth of the jig, I carefully transitioned to the actual soundboard.

Once I had routed the channel in the soundboard, I checked it to make sure all the pieces fit.  I found that it was just a little too tight and went back to widen it just a smidgen.  When I was finally happy with everything, I labeled each piece in order, set them aside, and got the LMII instrument glue out.  I made sure a thin layer of glue covered all surfaces of the rosette channel and then put each piece in.  Once everything was in and properly positioned, I used go bars to apply pressure to every piece to make sure none popped out of place.


The real education came when I realized I had almost an eighth of an inch of hardwood that stood proud of a properly thinned soft spruce soundboard!  Despite this being the standard way of doing things, I vowed next time I'd place and glue the rosette before I thinned the soundboard with the wide belt thickness sander.  I tried hand sanding the rosette with a series of block sanders but found little success and a lot of frustration with how slow the process was.  Enter the micro gouge!  With this little Flexcut baby I could maintain the precise control I needed to save from destroying the soundboard itself while removing a lot of material in a short amount of time.  If you have one, I highly recommend you try it.


Once I got most of the material removed and got close to the soundboard face, I switched back to sanding blocks with much more success.  When everything was about flush I decided to fill in any small gaps with CA glue mixed with fine sanding dust.  Once everything was dry again I finished the rosette off with a long, straight cabinet scraper, which worked wonders!  Now my problem is, how to get that great edge back on the scraper...


 Anyway, the scraper finished it off beautifully and I closed the difficult chapter of rosette making by using the circle jig to cut the soundhole - oh what a sense of accomplishment!  Unfortunately I don't have a final picture of the completed soundboard to show you but I'll post it later.  Thanks for waiting so patiently for me to finish rosettes!  Now we're on to sounboard bracing - yea!

And it's many many months later.  Here's the completed rosette and soundhole (though I do recommend you wait to cut the soundhole until you've marked the back of the soundboard for your brace placements but before you actually start gluing anything!).  I guess I should devote a short post strictly to cutting out the soundhole itself, but we'll save that for another day.  If you're building your own guitar, good for you, and you'll figure it out -- I did... 

Thursday, January 6, 2011

Did I mention I love Brazil?

Obrigado para a leitura. Brasil é impressionante!  There's nothing finer than the tonewoods that come from the vibrant, varied, and gorgeous country.  I've never been there but I hope to visit someday.  If you're curious about anything in particular, feel free to ask me a question in a comment!  Adeus.

Tuesday, January 4, 2011

Getting back to rosettes

As I was saying, the first step to successful rosette making is the same with every step of guitar building - plan and take your time.  You can go back to arguing the chicken or the egg all you want, but it really doesn't matter; if you already have your materials in mind, think of what design might work best with those materials.  If on the only hand, like me, you have a design in mind, put it down on paper then go find the materials to match.

I, for some unknown reason, have a fascination - or perhaps a fixation - with spalted and ambrosia maple; I can't help it, to me it's God's gift to luthier-kind.  It must have been ingrained in my psyche after all those hours of continuous searching on the internet for the most distinctive acoustic guitar traits.  I think my record was 5 hours one late night until my eyes glazed over, rolled back into my head, and my wife found me the next morning keeled off my chair in a puddle of drool, twitching and muttering spalted maple, spalted maple... over and over again in my sleep.

Needless to say, the counseling helped but did not cure me of my spalted maple craze.  So getting back to the real story, I looked online at a few places, finally found a mill in Maine that sold some decent sets of spalted maple, bought a couple sets and had the mill resaw the best set into 1/4 inch plates that could be easily utilized in the shallow rosette channel.  Once I had the materials, my inspiration, in hand I began to draw a 1:1 mock-up of the rosette on paper.

I started by tracing the soundhole outline in the center, then played around with varying rosette widths and compositions.  I ended up deciding to keep it simple on the first go around - center spalted maple ring about 1/2" or 5/8" in width surrounded by thin 3/16" curly bubinga border rings.

Next I carefully drew the desired circles for each wood plate using a vintage compass.  The bubinga was easier because, after jointing and joining two smaller book matched plates together, I could simple scribe the inner and outer rings I wanted and cut them out from the same plate.  Word to the wise, when doing something similar, start from the outer most edge and work your way in on subsequently smaller diameters.  Otherwise you'll find you need to do some special engineering if you start from the inside and work out!

The spalted maple pieces were much more tricky.  For the center ring, I wanted to get a lot of figuring in that little space.  You're liable to win the lottery before you find the perfect piece of spalted maple for such a task, so what I've seen done on a number of examples, is to cut out several smaller sections from highly figured areas in the proper curvature, then joint them together.  You can make it obvious or subtle, either way works.  I can't say which exactly mine ended up being but it's probably on the subtle side.

To do all the cutting I used a StewMac Foredom tool jig used to make precision small circular cuts.  It worked well once I figured out how tight I needed to keep all of the nuts and screws on the thing when cutting through hardwood.  All the vibration would loosen everything up until I was completely out of alignment.  Good thing I learned all this on practice pieces, something I highly recommend you do for rosette making.

Once I had all the pieces routed with the Foredom jig and a down-cut spiral bit, it was time to rout the lay-up board which would be used to fine tune the pieces in preparation for the harrowing process of routing your precious soundboard.  Unfortunately, I still haven't gotten to the bottom of finishing off the rosette.  One more post ought to do it.  I apologize for the lack of pictures, but I think all of the pictures I have can be seen on the slide show below which links to my Flikr site.  I'll be sure to put some nice shots in my last post on completing the rosette.  Until then!

Wednesday, December 29, 2010

One step closer

Hooray for me, I finished the soundboard!  Just sanded the last brace tonight.  I know I'm jumping ahead and haven't finished with the rosette yet, but I thought you might like to revel with me in this little triumph.  I stopped over at a luthier friend's house last night and got a lot of good pointers and picked up my next back and side set - figured cocobolo!  No sap wood, but it looks great.  Thanks Trevor!!  You can check out his site at http://www.peakeguitars.com/ - he has a Facebook page too but I'm not sure what it is.  Alright, it's late and we're heading out to the cabin in West Virginia tomorrow so I'm going to bed.  Goodnight.

Monday, December 27, 2010

I'm running out of cool titles! Oh wait, rosette me - rosette me not.

So you decided to stick around and see if I actually stood up to my promise of writing again soon?  Well I'm actually surprised I got around to it one day later...  Shhhh, my wife doesn't know I'm goofing off on the computer while she's watching the baby downstairs - I have to type quick!

So the rosette from the underworld - well friends, it was not easy but I don't think rosettes are intended to be easy, they're intended to challange and inspire.  Uh oh, busted - well looks like I won't be able to finish it tonight.  My wife says "Hi!" to everyone.  I guess I'll try to pick up where I left off tomorrow.  Bis bald Freunde.

Sunday, December 26, 2010

Soundboard II, the Saga continues...

I must begin with a sincere apology, it has been far too long since I have last written.  Work and baby duties have played a large part in my lack of time.  Fortunately, however, I have been able to find a few brief moments of blessed release to work on the guitar recently.  I am almost finished with the soundboard, but I must first bring you up to speed (I hope to get caught up sometime during the holiday since I will be off work for a week - but if you have babies or wives you know that the best laid plans of mice and men never survive first contact with the enemy...).

So without further ado, on to the guitar.  I last left you with a joined soundboard cut in the general shape of the triple-O body.  I forget now if I told you I followed the same procedure to joint and join the back on my last post.  It was much more difficult shooting the crotch-figured black walnut, it being a much harder wood and being prone to chip out.  I eventually tuned the plane to the right depth for the new medium, got the plates jointed as evenly as possible, then joined them on my homemade platform with knock-off go bars.


If you can zoom in closely, you will see grain separation in parts of the back.  These I will have to fill with a epoxy and saw dust mixture at a later time before I can attach it to the body.  I haven't done it yet so I'll have to fill you in later.

So getting back to the soundboard - the next step I took was to thin the back to the proper thickness.  It ended up being a bad idea when I got around to putting in the rosette, but I'll get in to that in a little bit.  So I started thinning the soundboard the old fashioned way with a toothed plane.  It looked cool and felt cool, but I soon discovered that it's difficult to get a uniform thickness and even more difficult to tell how much you've taken off.  It's kind of hard to see, but the next two pictures show my misguided approach to toothed planing.  I tried it for a little bit and that was enough - knowing I'd have even more trouble for the back I decided I needed to find a better way - enter the power wide belt thickness sander compliments of the Cayce Company, located close to Timonium.


After searching hours on the internet, writing random emails to random shops and luthiers in the greater Baltimore area, I finally somehow ended up calling the good people at Cayce to inquire about purchasing something that might help me.  They informed me that for a very low rate, they would let me use their showroom wide belt thickness sander any time.  So on one of my off Fridays, I gathered up all of my side pieces, the back, the soundboard, and some spalted maple boards I had acquired from a supply mill in Maine and headed to Timonium.  Inside of 20 minutes I was completely done and out of there!  It's amazing what wonders the right types of modern technology can offer.  Building a smaller guitar, I stayed on the thin side of the recommended thickness ranges for each set.  Once I got everything home, I started right in on the rosette from hell.  But, that will have to wait for the next post, and I promise it won't take me 2 months to get around to it.  Until tomorrow friends!

Sunday, November 28, 2010

I'm getting ahead of myself

Hello, hello, hello, I'm getting ahead of myself with this latest post because, quite frankly, if I don't speed up, I'll be finished the guitar before I'm halfway through the blog story and since it will take me forever to build the guitar, it will take two forevers to finish this blog...  So, let's fast forward a bit shall we.  (I must confess I'm a little short on pictures too, and who wants to read a boring blog without cool pictures to go along with it?!? I know I wouldn't!)

After I cut the neck out with the band saw and routed the dovetail with the router table I made, I proceeded to carve the neck with a dremel tool to get the rough rounded shape.  After that, I used a series of draw and carving knives to take it down further.  Then I used progressively finer gritted sand papers to smooth everything out.  When all is finished I'll use a cabinet scraper and 400 grit sand paper to put the final finish on the neck.  Other than routing the truss rod channel I have not yet touched the rest of the neck, including the fingerboard or the headstock.  Those will come later because, as I've said before, I'm very ADD and wanted to skip the hard stuff and move on to something more fun.

Which segues nicely into my next picture - joining the soundboard. 


Before I could get to this point I first went to Cayce Industries (they have a huge belt thickness sander) to bring the individual plates down to close the proper thickness.  Once that was done, I had to build a shooting jig (no I don't have a picture, but I can get one) to joint the plates.  This is extremely important as it is what lines up the two plates for joining.  If the common edge is not jointed properly, there will be gaps in the soundboard seam.  It took me a while, but I finally got the knack of shooting, and I finally make a joint good enough to join.  (This step also makes really pretty spruce curls that you can use in your book quality staged photos;-)  Before you glue, make sure you practice your steps so you have it down.  I put a slim piece of newspaper under the seam so that I wouldn't glue the plates to the work surface.  You lay the far plate down first against a stop and fasten it with clamps (I use fiberglass rods), then you put a thin bead of glue on the second plate, lay it down against the first, slide it back and forth, then clamp it from above.  After that you wedge it from the side to close up the seam nice and tight.  I let it dry over night and you can see the result below.


In an effort to keep my posts shorter so that more people may consider actually reading them, not that I hold any real faith that anyone will, I will stop boring you now... 

Friday, November 5, 2010

Aaaah finally he's getting somewhere!

Yes indeed, finally it's time to stop blathering and start building.  Well my first project began with the Honduran mahogany neck.  I purchased a single block large enough to actually cut out two necks (just in case I royally bombed on my first try).  I decided early on to take a purist's approach to this guitar project - time and experience has tempered my visions of grandeur, though.  In this vein I decided to make everything as high quality and traditional as possible - hence the Adirondack Spruce, the other uber expensive woods, and the single solid neck. 

Many of today's luthiers and guitar manufacturers actually build composite necks by cutting the neck completely straight, then going back to cut the head at a specific angle to re-glue it upside down to make the proper attitude.  It's called a reverse headstock (you can see a good explanation at http://www.seagullguitars.com/seagullstory.htm).  This method has been proven to increase neck strength with minimal appearance drawbacks.  I personally, though, didn't like the idea of introducing any more room for errors or weak points than necessary.  Besides, I bought a nice truss rod from LMII and used the best grade mahogany I could get my hands - so the benefit is a wash and I get to keep an unmarred monolithic neck.

I began by tracing the rough outline of two necks on the large block.  After cutting both outlines out with a band saw (thanks for the next five Christmas presents dear!  I'm currently on buying restriction till I die...).  Next I drew the many views (top, side, heel, etc.) from the plan on tracing paper.  I then cut the views out with a razor blade and retraced them on the rough mahogany block.  Once I had the neck drawn I proceeded to tackle the most difficult and important part - the heel.


The heel is one of a few critical structural parts of an acoustic guitar.  It is how the neck attaches to the body and there are many methods to choose from, ie. mortise and tenon, bolt-on, dovetail, etc.  I won't go into them, but suffice it to say I went with the plan instructions given to me - the routed dovetail.  I was not about to go changing the professional designs for my first ever guitar just willy nilly.  I also figured it would be a good excuse to go buy some more man toys (thanks again, dear, for the next ten year's worth of birthday presents!).  So long story short, I bought a Porter Cable router and other needed accessories, built a router table into my table saw wing, and then began to experiment.  I'm usually very impatient, but so far I've been successful at cooling my jets and working slowly and deliberately.  With as much hard work as making a guitar is, I did not want to inadvertently have to start from the beginning again because of a rushed blunder. 

I finally figured out the best way to rout the dove tail and went for it.  It turned out perfectly until I got sloppy finishing up.  The dove tail was done, but then I noticed a final bit of material that needed to be cut off, so I ran past the router one more time.  I should have been paying attention because as I was intent on getting that last little nobbin, I inadvertently shaved a corner of the dovetail.  To this day I don't know if that will ruin the entire connection and whether I will have to start all over again or not.  So far I'm not worried, I think it will be just fine.

Once the heel was done, I cut the taper in the neck to match the future fret board on the band saw.  This I couldn't manage also without making another minor mistake - I got a little too fresh with the band saw and it bit back by cutting into the neck close to the headstock.  It's pretty small though, I think I can fix it with sawdust mixed with epoxy.  I doubt it will be completely unnoticeable, but it's maker's marks just like that which give our creations character!  After carving the neck down some with the foredom tool and sanding it a bit, I decided I had had it up to the chin in dealing with necks and put it down until it was time to attach it to the body.

So ends this first chapter in creating the guitar neck.